
9...b5 (see diagram)
A bad move. Black naturally wants to solve his problems with a counterattack, but with White's lead in development, the open lines will profit the first player much more. White now attacks!
10.Nxb5
Powerful! White's sacrifice of the Knight is justified by Black's cramped position. He will be unable to meet White's coming attack.
10...cxb5
Black has little choice. He either has to take the Knight or be down a Pawn with no compensation.
11.Bxb5+ (see diagram)
Now, Black has to get out of check somehow, but his options are limited.
11...Nbd7
The other Knight is pinned to Black's Queen, and moving the King accelerates his own defeat, so blocking with the Knight is the only good move.

12. 0-0-0
White castles Queenside, a superb move. The Rook is now attacking the pinned Knight, and Black needs to defend it again.
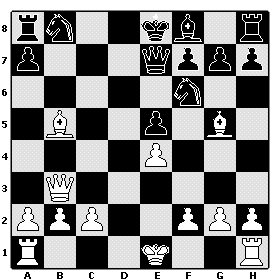
12...Rd8 (see diagram)
A 'must move'. There is no other good way to defend the Knight, because the f6-Knight is pinned.

13.Rxd7
White's sacrifice of The Exchange is amazing! He realizes the fact that Black's f8-Bishop and h8-Rook are playing no part in the game, and if he can break through Black's defenses, he will win.
13...Rxd7
Black must recapture.
14.Rd1 (see diagram)
White brings his last piece into the game with unrelenting pressure.

14...Qe6
Black desperatly tries to get out of some pins. This move unpins the f6-Knight, and offers to trade Queens, which, if White accepts, would greatly diminish White's attack.
15.Bxd7+ (see diagram)
White sees a forced win here, and plays it out.
15...Nxd7
If Black recaptures with his Queen, White's Rook would quickly chop it off.

16.Qb8+ (see diagram)
Brilliant! White sacrifices his Queen for checkmate!
16...Nxb8
Black's only move.
17.Rd8#
Checkmate!!