
It is #sendacardtoafriendday on Friday and in preparation, we will look at a quick way to create a picture card or a poster, using PowerPoint, to share with our friends on social media. As a demonstration, we will be creating a square card (see the picture above) to post to Instagram this coming Friday, but you can do any size you like (for instance, if you want to create a poster). You don’t have to stick to the normal landscape slide sizes!
So here are the quick steps:
- Open PowerPoint on your computer

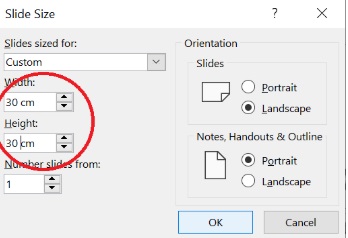
- Click on Design → Slide Size → Custom Slide size

- Choose your slide size. I have chosen a square slide size 30x30cm. Click on OK
- Maximise the size of your slide

- You may choose a PowerPoint template background

- Or you can insert a picture from your picture folder (Insert→ Picture) or search for an online picture if you have Internet. Drag the handles to fit the slide if needed.

- Add your text (Insert→ Textbox) and drag a box to type in (pick a good font and enlarge), move it to where you want it. You can also give the textbox a background colour and make it transparent:
- Click on the textbox – it must show handles → Right-click and choose Format Shape
- Choose the colour that you want for your text box and change the transparency.

- When your picture slide is ready- Save it as a picture card!!:
- File→ Save As → Name your picture
- Don’t save as PowerPoint slideshow but choose *.jpg from the dropdown arrow on the right

- If you have made more than 1 picture slide and want to just print the one you are busy on, choose Just this one → Export

- The slide picture will now be in your chosen folder ready to send your card to Instagram!

- The card is ready to post to Instagram or anywhere!!
For a printable PDF version of this step by step instructions, click here