Module 9 - Using the Showing Evidence Tool to Target Thinking Skills
Activity 9.6
Step 6: Creating Team IDs with the Project Wizard
In this step, you will create team IDs and assign a reviewing team for your practice project. Consider whether you will incorporate the use of reviewing teams in your project. You can assign one or more reviewing teams to each team. A link to a read-only version of the team's argument case would appear in the reviewing team's workspace. The reviewing team will see the current work of the team they are reviewing, but will not be able to make changes to the work. Reviewing teams can, however, make comments by clicking the small triangle at the upper-right corner of the evidence, the evidence rating, the support rating, or the claim.
If you want to create specialized team IDs, go to creating teams.
If you are not already on the Manage Project Teams page, on the Teacher Workspace: Your Projects page, click the team link in the Student Teams column next to the appropriate project name.
- To create new teams using the project wizard, click Create a set of new teams. Or, to assign existing teams, scroll down to the Teams currently not assigned to this project section. Click the check boxes next to the teams you have already created and click Assign checked teams.

| Note: If you already have wizard-created teams and you use the project wizard again to set up teams for this project (with the same base word), the wizard will recognize that you already have those teams and assign them to this project. The Student Teams will be able to view and access both projects from their Student Workspace. |
If you are using the project wizard to create teams, enter the number of teams you need for the project. Assign at least two teams for this practice project.
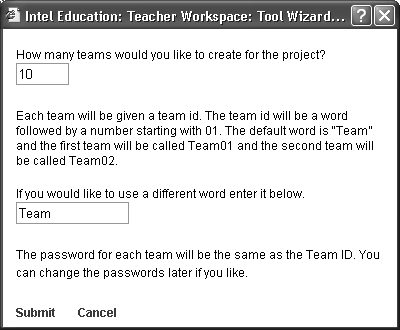
Consider whether you want to keep the default word of Team as the base word of your team IDs. Change if desired.
Click Submit.
After you have assigned teams to the project, you may also assign one or more teams to review the work of each team. Click the link, None, in the Reviewed by column for the desired team. For this practice case, be sure to assign a reviewing team.

Click the checkbox(es) next to the teams that you want to be the reviewer of this particular team.

Click Submit at the bottom of the table.
Click Done when you are finished.
-
Write down your team IDs and passwords.
