Module 10 - Considering the Showing Evidence Tool for Your Project
During this module, you will try out your project ideas by creating a practice Showing Evidence case, discuss and practice effective questioning techniques, provide and receive feedback on your ideas, and use tips on implementation and assessment to revise your Project Plan.
Activity10.1
Creating a Practice Case
The purpose of creating a practice learner case is to test your concepts, practice the type of discussions and questions you would ask your learners, and then revise your project description, prompt, and requirements, as needed. The other purpose of this practice case is to determine whether the use of the Showing Evidence Tool really is the best fit for your project. You may decide, after trying out your ideas, that the use of another thinking tool would support your project’s objectives in a more direct way.
When creating your practice learner case, ensure that you follow the model you expect your learners to follow in respect to the
- Rating criteria for evidence quality, evidence support, and claim
- Format and level of detail in the descriptions
- Choice and format of sources
Follow the steps below to create a practice learner case. These are the same directions you would provide to your learners when you are ready to have them create their own argument. Use the Intel® Education Help Guide if you need assistance in completing any of the ICT skills identified.
Open Showing Evidence from your Favorites. (www.intel.com/education/showingevidence)
-
Click Enter, and then on the page that opens, click learner Log-In.
-
Log into the Showing Evidence Student Workspace.
Click the project name to enter the case.
Review the elements of the Showing Evidence case.
Depending upon your project, you may be creating evidence first or a claim first. Follow the steps below in the order that is appropriate for your project.
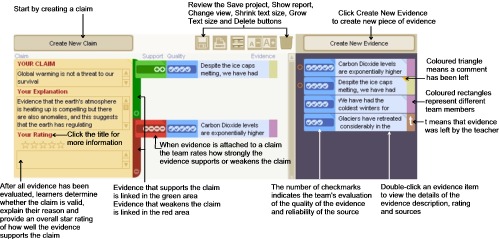
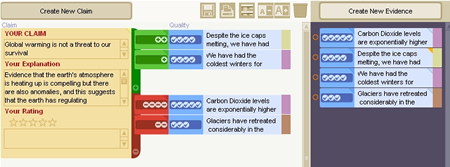
Create a claim.
Click the Create New Claim button.

Enter a short sentence in the Your Claim section so that it can be read with minimal scrolling.
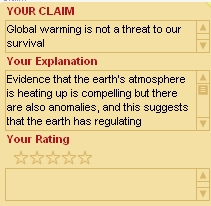
Enter a more detailed explanation of the claim in the Your Explanation section, if needed. Expand upon the claim summary and elaborate on its meaning.
The Your Rating section normally would not be completed until all the evidence has been created and evaluated. However, you may want to instruct your learners to update this section as they go. It can provide a snapshot as to how they feel the argument is progressing at the moment. They would then modify it as they gather more evidence.
Create evidence.
Click the Create New Evidence button.

The Evidence Summary needs to have a very short title that is as clear as possible. You need to be able to scan and understand the titles when the evidence is attached to the claim.
The Explanation contains the detail of the evidence. You will need to clarify for your learners your expectations for this section.
The Source contains information about where evidence came from. Web site addresses pasted in this section are "clickable." Clarify for your learners your expectations for this section as well, including the acceptable resources.
-
Click the
 button to rate the quality of the evidence and to provide the rationale.
 - Near the top of the evidence area, you will see a darker blue rectangle labeled Evidence Quality. Click within the dark blue area to rate the quality of the evidence source from one checkmark (low quality) to five check- marks (high quality). This rating should indicate the level of assurance you have for the reliability of the source and quality of the evidence.
Note: The Evidence Quality is rated solely on how well you trust the source and believe that the evidence is accurate. The rating is not to be based on whether the evidence supports the claim.
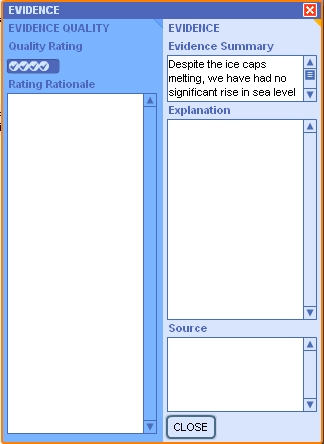
In the Rating Rationale section, type an explanation as to why you rated the quality as you did.
Close the Evidence window.
- If desired, you can choose to color-code the evidence within the Evidence Bin. Click the right-side of the evidence to access the colors, and then click on one of the colors that appears.
![]()
Attach evidence to the claim.
Click, hold, and drag the evidence to the right side of the Claim.
If you think a piece of evidence supports the claim, drag it into the green (upper) area of the claim. If you think it weakens the claim, drag it into the claim’s red (lower) area.
- After
you release the evidence item, a window will open. In this window,
click the plus marks to indicate how strongly the evidence supports the
claim—or when attaching to the red area, click the minus signs to
indicate how strongly the evidence opposes the claim.
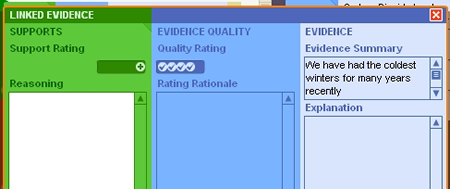
Enter your reasoning.
- Close the window.
- Review evidence to rate the claim.
Note: See the Strength of Evidence Rubric.
After reviewing and rating all the evidence, analyze the strength and quality of the evidence and determine whether the entire body of evidence results in supporting or opposing the claim.
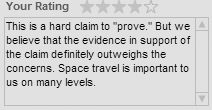
- Indicate by the number of stars in the Your Rating section how well you believe the claim is supported.
Type an explanation as to why you believe the claim is supported, refuted, or undetermined.
Note: See the Evaluation of Claim Rubric.
Make a conclusion.
Use the conclusion area below the Claims Workspace to summarize your thoughts about the case.
b.If your case includes more than one claim, use the conclusion area to make judgments about the case as a whole.
Add comments.
Team members can leave comments for each other when not working together, for the teacher, or for the reviewing team. The teacher and the reviewing team communicate back to the team authors through comments.
To add comments to evidence, click the triangle at the upper-right corner o fan evidence item. A Comment box will open.
Add text in the bottom section of the Comment box. (If you were reviewing another team's case, then your team's name would appear next to the comment.)
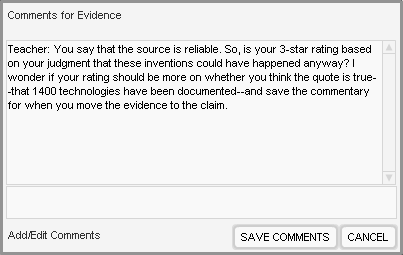
- Click Save Comments.
- This feature will allow you to view all the descriptions and ratings of your evidence and claims in one page.
- This page would be helpful if learners are using the information gathered using the Showing Evidence Tool to produce other reports or products.
Next: Proceed to Activity10.2
